1. Product Overview
ItechPanel_AutoFulfill is a robust order fulfillment solution designed to streamline your warehouse process. It combines a powerful Magento 2 extension with a dedicated Windows Desktop Application.
This system automates invoice creation, payment capture, shipment generation, and packing slip printing instantly through a simple barcode scanning interface.
2. Key Features
- Barcode Scanning Workflow: Process orders instantly by scanning order barcodes or inputting Order IDs.
- Auto-Fulfillment: Automatically creates Invoices, Captures payments, and creates Shipments immediately upon scan.
- Label Generation: Generates standard PDF packing slips and integrates with GLS for shipping labels.
- Desktop Automation: The accompanying Windows software automatically detects new jobs and prints them to your local printers without opening PDFs manually.
- Print Queue Management: A dedicated "Printings" grid allows you to track status and reprint damaged labels easily.
3. Installation
Part A: Installing the Magento Extension
The module is installed via Composer. Run the following commands in your Magento 2 root folder:
1. composer require itechpanel/print-order-magento-2-module
2. php bin/magento setup:upgrade
3. php bin/magento setup:di:compile
4. php bin/magento setup:static-content:deploy da_DK en_US
5. php bin/magento cache:clean
composer remove itechpanel/print-order-magento-2-module
Part B: Installing the Desktop Software
- Download the
ITP Auto Fulfill-Setup-1.0.0.exefile provided with your purchase. - Run the installer on the Windows computer connected to your printers.
- Once installed, launch the application from the desktop shortcut.
4. Magento Configuration
Navigate to Stores > Settings > Configuration > iTechPanel Extensions > Auto Fulfill > General Settings.
This section allows you to control the automation behavior and customize your print outputs.
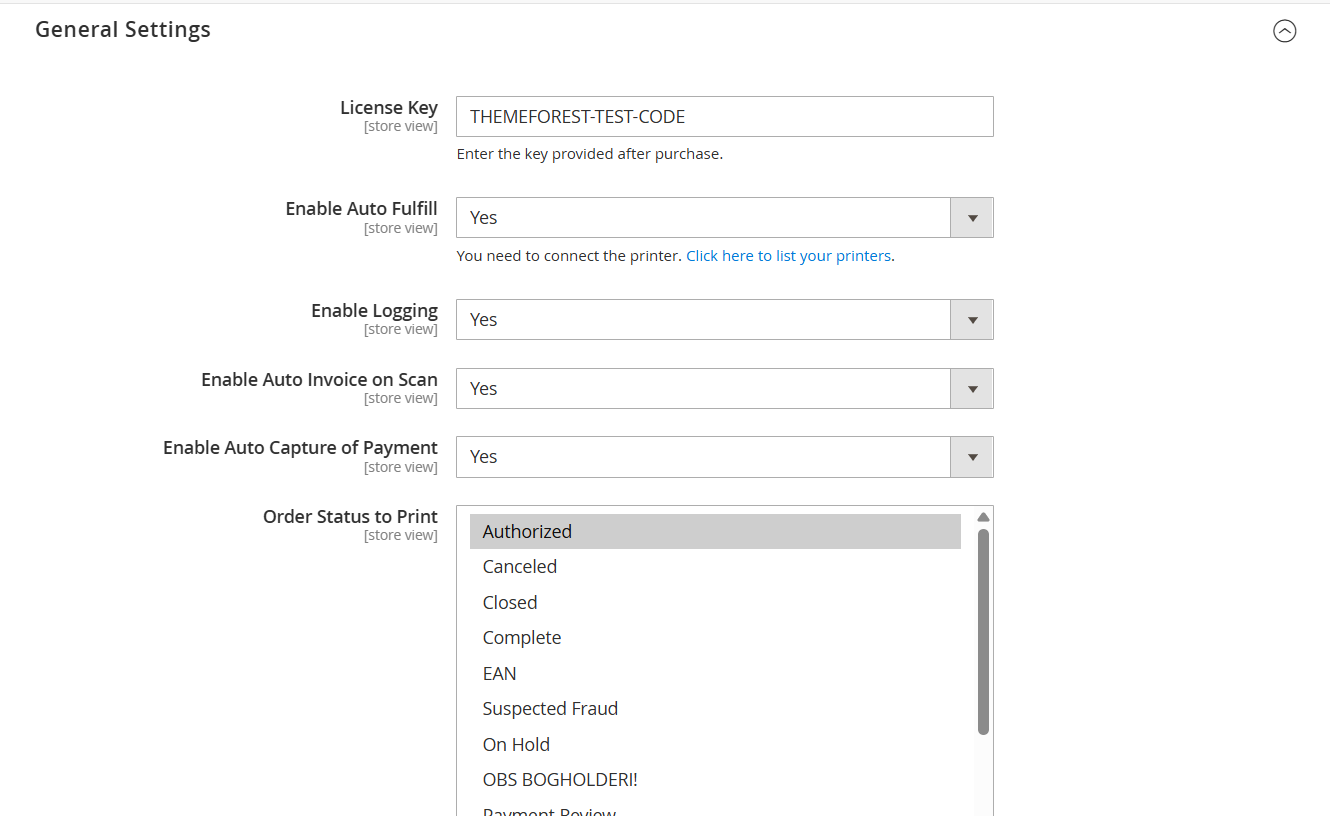
General Settings
-
License Key: Enter the license key provided after purchase.
(Don't have a key? Click here to generate it using your Order ID) - Enable Auto Fulfill: Select Yes to turn on the module functionality.
- Enable Logging: Select Yes to save a history of scans and API requests to the database (
itp_orders_log). Recommended for debugging. - Enable Auto Invoice on Scan:
- Yes: The system automatically creates an invoice when the barcode is scanned.
- No: You must invoice the order manually before scanning.
- Enable Auto Capture of Payment:
- Yes: The system captures the payment immediately when the invoice is created.
- No: The invoice is created with a "Pending" status.
- Order Status to Print: Select which order statuses are valid for scanning (e.g., Authorized, Processing). You can select multiple statuses by holding
Ctrl(Windows) orCmd(Mac).
Print Template
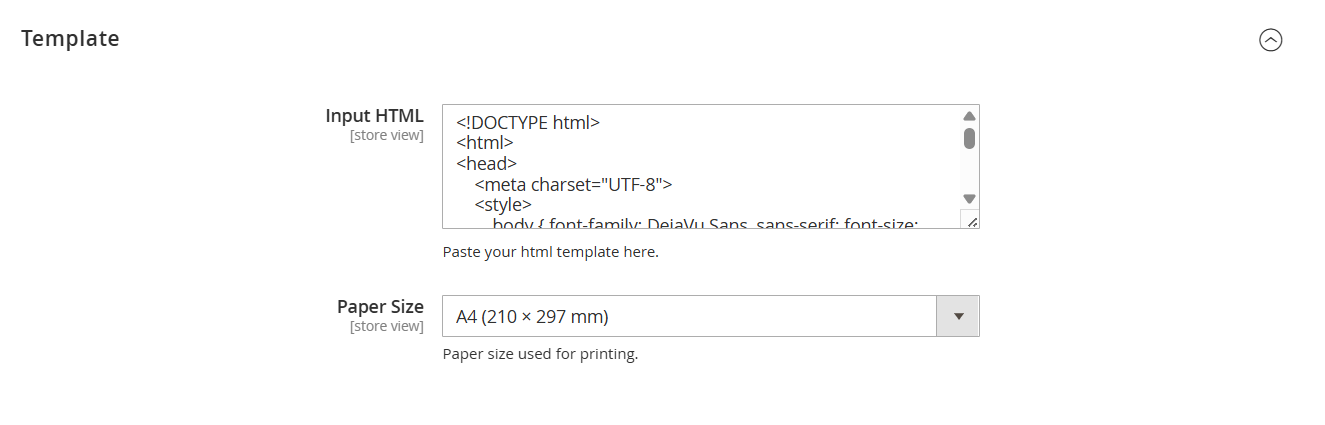
- Input HTML: This area contains the HTML code for your packing slip layout. You can edit the HTML/CSS to add your logo, change fonts, or adjust the layout.
Supported Variables:{{var order.increment_id}},{{var shipping_address.name}}, etc. - Paper Size: Select the physical paper size for the generated PDF.
- A4 (210 x 297 mm): Standard size for packing slips/invoices.
- A6: Standard size for thermal shipping labels.
5. Desktop Software Setup
To connect your store with your local printers, download the ITP Auto Fulfill desktop application compatible with your operating system:
Once downloaded, run the installer and follow the on-screen instructions.
Activation & Connection
- License: Enter your Registered Domain and License Key to activate the software.
- Store URL: Enter your Magento URL (e.g.,
https://yourstore.com/). - User ID (Admin ID): (Crucial) Enter the Magento Admin User ID of the staff member using this computer. This ensures that this printer only prints orders assigned to or scanned by this specific user. (Used only for GLS Shipping API)
- Credentials: Enter your Magento Admin Username and Password.
Printer Selection
In the Configuration tab, select your specific printers:
- Order Printer: Select the A4 printer used for packing slips.
- Label Printer: Select the thermal printer used for GLS labels.
6. Usage Guide
Step 1: Scanning Orders
Navigate to Itechpanel > Scan in your Magento Admin.
- Click inside the input field.
- Scan the barcode on your pick list or type the Order ID.
- System Action: The system will immediately Invoice, Capture, and Ship the order based on your configuration.
Step 2: Automatic Printing
Once scanned, the Desktop Software (if running) will detect the new job within seconds.
- It automatically downloads the generated PDF.
- It sends the job to the correct printer selected in settings.
- It marks the order as "Printed" in Magento to prevent duplicates.
Step 3: Monitoring & Reprints
Navigate to Itechpanel > Printings.
This grid shows the status of every scanned order:
- Is Printed: Green indicates successful printing. Red indicates pending.
- Reprint: If a label is damaged or lost, select the order and choose "Reprint" from the actions menu. This resets the status so the Desktop App will fetch it again.
7. Troubleshooting
Software Not Printing?
- Ensure the User ID in the software matches the Admin ID of the person scanning.
- Check that the "Start Service" button is clicked and the status is green.
- Verify your printer is online and selected in the software configuration.
PDF Issues (Black/Blank Pages)
If prints are coming out black or blank, it is usually caused by a network rendering delay. The software includes a built-in safety delay to handle heavy PDFs. Ensure your internet connection is stable to allow full download before printing.
8. Support
If you encounter any issues not covered in this user manual, or if you require assistance with installation or configuration, please reach out to our support team.
Contact Email: support@itechpanel.com